Showing posts with label crafty projects. Show all posts

Saturday, December 17, 2011

Christmas Crackers


The other day a friend and I were reminiscing about the Christmases we remember from our childhoods. During this conversation she also spoke of something her husband remembers from his. Her better half is British and as a child always looked forward to something called “Christmas Crackers”. Of course, having never heard of this before I thought she was speaking of a fancy saltine. Boy, did I feel culturally illiterate!

Turns out, Christmas crackers, a Christmas tradition in the United Kingdom and a few other places, are cardboard tubes filled with little toys and trinkets wrapped in bright paper and tied at each end. The crack in “cracker” comes from the popping sound made when it is pulled apart, which is sometimes done by two people much like pulling apart a wishbone.


Well, I guess you know what project I’m now dying to do with the kiddos around here (if time permits, and that's a BIG "if"). I might even have to make some for my niece and nephews. I’ll for sure post pictures when I do. I can’t wait. I’m going right now and collect empty toilet paper tubes.


P.S. You know, the more I think of it, this sounds like something one of my teachers in grade school would have done with us as a Christmas craft. My 4th grade teacher was a very artsy gal and we were always making crafts and learning about a sundry of things. I think this was also the year we took a field trip to Cheekwood Mansion and Museum to view all the Christmas trees, each decorated that year according to the different traditions and customs of a specific country. If you are in the Nashville area I would highly recommend a trip to Cheekwood during the holidays!

Monday, February 14, 2011

Candy-Filled Hearts

Happy Valentine's Day, gals (&/or guys)! I'm afraid to say this hasn't been the most celebrated v-day we've had, as Ren is sick with a bad case of the flu. It began Saturday morning with complaints of leg aches, and by that evening she was complaining that even her hair hurt. I knew then she had most likely been struck by the dreaded flu. I'm just hoping John-Heath doesn't get sick or my elderly parents (though they, my mom and dad, have had their shots).

Needless to say my little girl is miserable. She is achy all over, has a terrible sore throat, and can barely talk. Plus, her doctor said she was somewhat dehydrated. And, of course, this hits at the end of bball season so she will be missing the district games. You know how high-schoolers like to keep up with their social agenda. She doesn't play but she loves to go and cheer on the team from the stands. I always wished she had played more. She's 5'10. You'd think she could have been useful under the goal. Anyway, that's another story. She will also be missing school all week - according to her doc- and is worried she'll get behind. Plus, her principal announced at school today that this was his last day. He is having to step down due to some health issues. She hated that she wasn't there to see him on his final day. She really thinks a lot of both the administrators and the teachers at her school (well, most of them anyway. You know, she is a teen and there's always someone they don't fancy). Mr. Oldham, better known as Big O, was my principal and is pretty much an icon in our local schools. I know Ren is really going to miss him.

Well, enough of our affliction account. I wanted to show you what John-Heath and I made to use as gift sacks for Valentine's Day. I had seen the idea on the Martha Stewart site and thought it would be a nice way to deliver sweets to our sweets. For step by step instructions be sure to pay Martha a visit.

You can see below all the items needed to make these neat little heart shaped bags. Of course, a paper trimmer is not required. Scissors will work just fine. The hearts I made were created from paper ranging from 8" squares to 12" squares. The polka dotted one in the picture below was the smallest (at 8"). I also glued mine together a little.


We made these for John-Heath's teacher and her classroom assistants and for a few relatives.


The ones being sent to his school were each transported in a store-bought gift sack. If I had not put them in the sacks I can personally guarantee that NO candy would have made it to its recipient.


Each bag was filled with Hershey's kisses and hearts and a few of our homemade glass magnets.


Sunday, February 13, 2011

DIY Glass Magnets Make Great Teacher Gifts

Did you know that teachers are some of the most highly skilled kleptomaniacs around? It's true. We are well know for our thievery - mostly of ideas and the occasional stapler from the lounge, that is. We are taught early on in our education courses that when we see a great idea we should use it!

Well, here is my attempt at another stolen idea. Michaels has these for sale and I have seen some blog posts on them, as well. In need of a quick, easy idea of something to make to give John-Heath's teachers for Valentine's Day I decided to try my hand at these glass magnets. Simple and cheap inexpensive. Two of my favorite words when crafting.


Supplies needed:


flat, glass marbles


(I found mine at the Dollar Tree. They were a larger size, which I thought would work out better)


glue (I used my Mod Podge)


Magnets (Mine came from Wal-Mart)


Decorative card stock or scrapbooking paper.


To make, simply cut out pieces of paper to the correct size needed and glue on the back of the glass marbles. When this dries, glue on a magnet. When this is dry take a paper towel and a little Windex to really make that marble shine. Voila! A quick, simple, and budget-friendly gift for anyone, especially teachers, teacher aides, grandparents, and/or anyone who likes to display papers on a fridge or filing cabinet.


You can see I messed up on the first one just a bit - cut the paper too small. Practice makes perfect, though. John-Heath loves it when we craft. He helped out by putting some of the magnets in place and by cutting a few pieces of paper into about a gazillion smaller pieces of paper.


Linking to some great parties.


Linking up to...


Nest of Posies Big Valentine's Party.


Inspiration Friday @ At the Picket Fence

Sunday, January 16, 2011

Easy Peasy Silhouettes

I have long wanted to have silhouettes made of my children. Every so often there is an ad in our paper announcing the arrival of a certain maker of fine silhouettes to nearby shopping centers for a limited time. This man, whose name escapes me just now, is credited with creating ones for the grandchildren of President and Mrs. George H.W. Bush. Each time I've seen the ad I have always thought I should set up an appointment and take the kids. I have yet to follow through with that thought, though.

So, I thought for the time being I might as well just try to make some myself. Honestly, I am probably one of the last in bloggerland to try this. I had seen some on someone's site (their name also escapes me) that were made using a photo editing option in which you create a contrast between the head and the background and then erase everything but the head and shoulders. I tried this with little success. I'm not sure what I was doing wrong but I had a very hard time getting a smooth edge around the faces.

Anyway, I decided to cheat a little.


First, I took profile shots of my kids against my kitchen wall.


In case you're wondering (though you probably aren't), the paint color in my kitchen is English Red by Porter Paints.


After downloading the pics onto my computer I just printed them off onto regular paper. Then I cut them out, traced around them on black construction paper (which is all I had at my disposal at that particular moment), and cut them out one more time.
I cut out a piece of pretty scrapbooking paper to fit my cheap ($3) faux wood frames from Wal-Mart - On a side note...I miss the fact that few things are made from real wood anymore - and used Mod Podge to affix the silhouettes to the paper. I put a light coating of the MP on the back and pressed it into place and then put a very thin coating over the entire front of each silhouette. It goes on white but dries clear and gives it just the slightest sheen.

Finally, since they were small (5x7s), I picked a spot of minimal wall space so they would seem more in proportion. I hung mine in our foyer.


I didn't quite get Ren's on as straight as I would have liked so I will probably be redoing them at some point in the future. But for now, they do the trick and add a little something special to the entry of our home.


I am linking to these fabulous sites. Be sure to check them out for ooodles of ideas.

Friday, January 14, 2011

Want to Attend a Great Party or Two...

...or three or four? Below are links to some fabulous blog parties where you can find ideas for everything from crafts and home decor to recipes and beautifully set tables. Check them out. You will not be disappointed.


Its So Very Cheri


Visit thecsiproject.com

The DIY Show Off


Show and Tell Green


Keeping It Simple

Sunday, January 9, 2011

In Hopes of Some Snow...

To bide my time this evening as I anxiously awaited the ten o'clock newscast in hopes that the Snow Bird report would bring some good news, i.e. a snow day for tomorrow (which, by the way, has yet to materialize), I thought I would create something snowy to decorate a kitchen counter. I don't know about you but since I've taken down all my Christmas items things have been looking a bit drab.

Since I only just decided to do this a mere couple hours ago I had to use what I had on hand...no running to Wal-mart, JoAnn's, Michaels, or the Hob. Lob.

First, I just painted the inside of this glass candleholder-thingy with some watered down white paint. For the face I had three options...
1. Cut out some stickers using my Cricut.
2. Cut the facial pieces out of some type of paper and glue it to the glass using a little Modge Podge or Gorilla Glue (the latter may have been overkill because that stuff is AWESOME!).
-OR-
3. Use some of my craft paint to create a face.
I decided to paint on the face. All it took was a few squirts of my Americana craft paint and I had a cute as a bug snow votive.
Finally, a little Epsom Salt was added to the inside on which the candle would rest...


...and little more salt was added to the tray to give it all a snowy look.


I know what he's missing...a scarf! I'll have to add a little material around his neck tomorrow.
This is the same candleholder as it looked this past fall, with a wonderful smelling candle set inside a bunch of coffee beans.
The two little snowball candles were a gift from a teaching buddy (thanks, Angie) who said they were to remind me of "my own two little snowballs". I have been holding off lighting them until I had something to go along with them.
The counter as it currently looks. It doesn't show up very clear here but the cup and saucer candle (another gift from a teaching buddy - thanks, Kim) is lovely when lit. The picture in the black frame was a gift from John's brother-n-law. It is an aerial view of our house and part of the farm that he took one day as he flew over. And, of course, my baby boy's handprint. Although, he has started telling me he is "not a baby boy anymore".

It is now a few minutes after eleven in the p.m. and I still see no snow falling outside my window. I really think I'm about to cry. :<(

I'm linking to...

Carrie @ Dittle Dattle for Amaze Me Monday

Cheri @ It's So Very Cheri

The CSI Project

Roeshell @ The DIY Showoff

The Cottage Chick @ Cottage Instincts

Kaysi @ Crafts Keep Me Sane

Kim @ Savvy Southern Style

Tutorial Tuesday @ Hope Studios

Becca @ Blue Cricket Design

Whatever Goes Wednesdays @ Someday Crafts

Vanessa @ Southern In My Heart

DIY Club's DIY Project Party


Visit thecsiproject.com The DIY Show Off Keeping It Simple


Wednesday, December 29, 2010

DIY Thomas the Tank Engine Play Table


John-Heath loves Thomas the Tank Engine. In fact, he loves any and all things that roll, fly, glide, or sail. Each and every time we visit a local Barnes and Noble he immediately goes to the Thomas table in the children's section. After Christmas last year I regretted that Santa had not brought him one. He, John-Heath, had umpteen wooden engines and cars but none of the tracks and no table on which to put them. I decided that needed to change this year.

Some might say at 5 he is getting too old for a Thomas table. To that I say hog wash. I think he will still get many years of enjoyment out of his table. And when he no longer wants to play with trains he can use the table to build Lego sets.

The only problem we saw in getting him one of the actual Thomas tables was the height. We felt a custom built table would serve him better, so we helped Santa build one. Luckily, we have a very large storage room (which use to be a metals/carpentry class) within our school in which the work could be done in secret.

We picked out paint and lumber (made of poplar) at Lowes. The length and width had to be built according to the dimensions of a Thomas playboard I had ordered from Barnes and Noble, but the height was made to fit John-Heath.
John built the table (using an "up close" picture of an actual Thomas table) and put the primary coats of paint on and then I spent a few hours Christmas Eve night putting on the final paint touches, including a clearcoat on top of the blue.
This is how much John had finished prior to Christmas Eve.

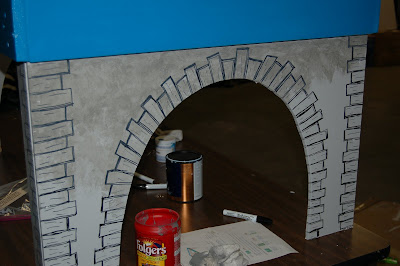
Using black Sharpie Opaque paint pens found at Michaels I drew on some stone on both ends and continued it around the legs of the table.


Then I mixed the darker grey paint I purchased with some water to make a "glaze" (I was out of real glaze) and patted it on using some old socks. All of the outer table (the grey part) was glazed, but I only did a little around the tunnel on the inside of the table.

The glazing is all done.

And, one more time, the final product - complete with the Island of Sodor playboard I had ordered.
I chose not to paint/draw on any of the trains, tracks, clouds and trees on the blue sides to keep it from looking too babyish should he outgrow the trains and decide to use the table for some other projects. I would like to say we got off cheaper by not buying one from the company but it came out about the same, if not a little more costly. Lumber's high, ya'll. I was honestly shocked at just how high. But, it's more appropriate for his size and, I believe, far sturdier so I can't complain.


This has to be our favorite project of the year, because it brought so much joy to our little boy.
P.S. I don't have a pic of this, but the inside of the table is inscribed To John-Heath from Santa. 2010.
P.S. An interesting side story...by the time we went to school to get the table around 10ish that night (after the paint had dried) it had already begun to snow - heavily. As we were in the school a police officer, who had seen our truck tracks in the snow while making his rounds, stopped to question us on our business inside a school at such a time. Thankfully, he believed us when we told him we were both teachers there. He even helped John load it onto the back of the truck.
I'm linking to...

Carrie @ Dittle Dattle for Amaze Me Monday
Visit thecsiproject.com